Jesteś rodzimym użytkownikiem języka polskiego? Super! Czy chciałbyś nam pomóc?
Jesteśmy bardzo wdzięczni za Twoje tłumaczenia lub zdjęcia / zrzuty ekranu, które nam pomogą zoptymalizować nasze instrukcję instalacji.
Podziekujemy Ci za pomoc z darmową 3 roczną aktywacją Twojego konta na SCDB.info.
Po prostu skontaktuj się z nami: info@scdb.info. Już teraz Ci dziękujemy.
The installation can only be done with a Windows computer.
The database cannot be installed with Mac computer.
Nissan Connect devices can not read USB flash drives when they are written by a Mac. Because the Mac is writing additional (hidden) files.
Speedcam alerts comes also without active navigation routing. Alerts appears approximately 250 meters before approaching.
Speedcams are shown by icons (small cameras) when the map is in foreground. If the map is in background, some devices bring an alert pop-up showing speedcam ID and speed limit (depending on device software).
Installation of new custom POIs always overwrites self-installed POIs from previous installation.
Nissan pre-installed POIs (restaurants, gas stations, etc.) will be never deleted.
The devices only offer an acoustic alert sound for POI warnings.
Voice alerts are not available.
Re-download the database and decrease the number of countries if you get an error message or system crashed.
We received advices that some devices with MapVersion sd2-CONNECT_2012_EUR v3 can only import a limited number of POIs.
POI installation is available for these devices:
Nissan Connect 1.5
Nissan Connect 2
Nissan Connect 3
POI installation is not available for these devices:
Nissan Connect 1.0
Nissan Connect 3 (MY2019)
Below we show you how to distinguish the devices.
Nissan Connect 1.0 and Nissan Connect 1.5 look very similar.
Try to find the device ID in the menu: Setup > Navigation > MyPoi Settings > Device Information.
Nissan Connect 1.0 devices do not show a device ID. POI installation is impossible.
Only Nissan Connect 1.5 show a device ID. POI installation is possible.

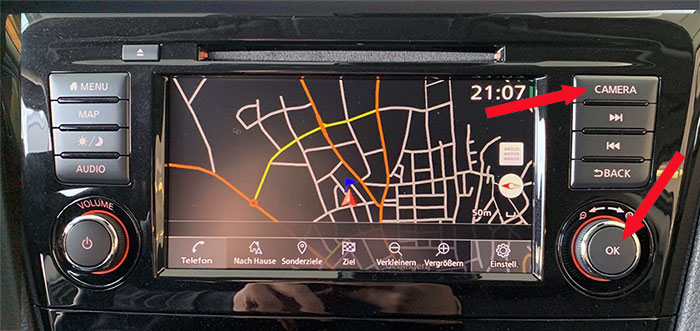
Nissan Connect 3 device below is ready for speedcams. Pay attention to the red arrows.
- ENTER in the right knob
- SD icon
- CAMERA key on left side of the screen

The free sample file for UK allows you to test if POI files can be installed on your navigation device.
Install sample file according to this installation guide.
Download sample file
Try before purchase. Refund excluded after download started of full database.
Go to our page for Nissan Connect.
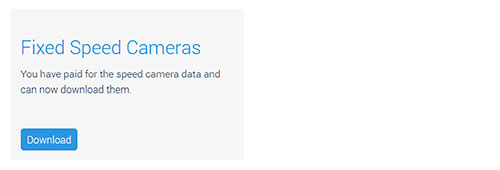
We offer only data of fixed speed cameras for Nissan Connect.
Press button Download.


Turn on the ignition.
Wait till device is completely started.
Connect USB stick to device (USB slot is usually on the right side next to ignition).
The device normally indicates installation of new POI files automatically. Confirm installation.
If not:
Click Setup key.
Go to menu Navigation > MyPOI Settings > Download MyPOIs Now.
If that also not work:
Connect USB stick first to the device and turn on ignition afterwards.
After a short time the display should automatically show a message that new POIs have been found.
Masz dla nas zdjęcia? (w Twoim języku)
Możesz nam pomóc z tłumaczeniem? Jesteśmy wdzięczni za każdą pomoc. Pomóż nam zoptymalizować nasze instrukcje instalacji.
Po prostu skontaktuj się z nami: info@scdb.info. Dziękujemy Ci.


Jeżeli chcesz zaktualizować dane fotoradarów w Twojej nawigacji później, powtórz wszystkie kroki opisane powyżej.
Pay attention to reformat USB stick each time before use.
As a rule it is not necessary to delete old data beforehand. But if you have any problems with the installation, you should delete old MyPOIs from system beforehand.
Radzimy aktualizować dane raz na miesiąc aby mieć aktualne dane.
Polecamy spojrzeć na nasze Często zadawane pytania.
W większości przypadków rozwiązanie problemu można znaleźć już tam.